Makeup Tips You May Want to Master
Fall is almost upon us once again and what better time to go through all of your makeup products and do a little cleaning. All of those beauty products you swore you would use that are still in their original packaging, you know the ones beauties. Go ahead and grab them cause we’re about to master all of those techniques you’ve been putting off. It’s so easy to fall into a beauty rut when you find yourself repeating the same old daily makeup routines, and unless you’re a professional makeup artist, then there’s a good chance that you may have gaps in your makeup knowledge that could use a little filling.
Every gal whose spends the time each day to put on her face should be able to master these makeup styles at some point in her life, especially because they can all be mixed and matched to always give you a completely flawless look no matter the amount of drama you’re going for. Yes beauties, they may take a bit of practice and yes there may be lots of tissues, Q-tips, and makeup remover involved but sometimes it’s the best way to really hone those skills and perfect the techniques you’ve been shying away from. So book yourself out for a few nights during the week and practice your beauty game, maybe even invite a few of your besties to join you in coming out of your summer hibernation as a perfectly made up new you.
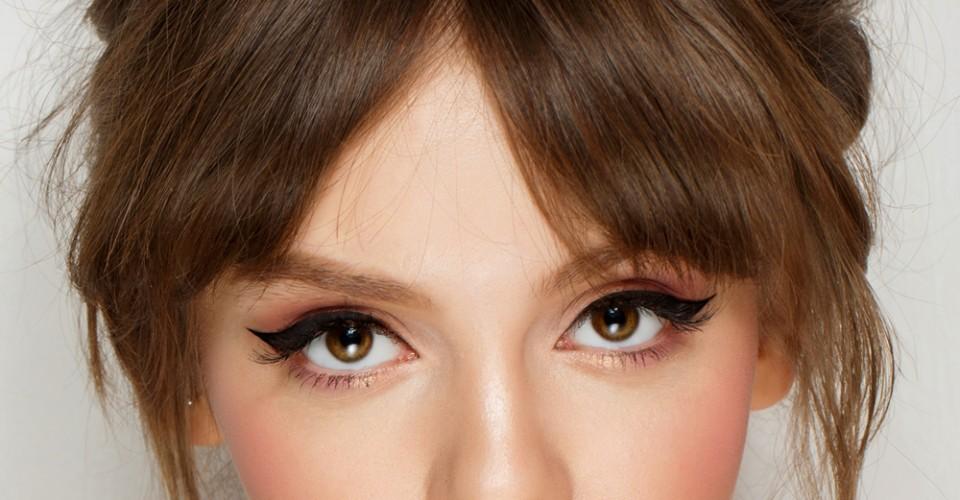
Perfect Winged or Flicked Liner
Once you’ve mastered the art of winged eyeliner, your life will be instantly changed. So much so, that you may even start to feel naked without any eyeliner. It’s an eye makeup look that is super flattering on pretty much everyone and can be created in numerous styles, not to mention colors and formulas.
To re-create the winged eyeliner look on yourself you have options. The first depending on how comfortable you are is to use a liquid liner. A liquid is great for creating this type of look. Another benefit is how pigmented the color is so you won’t be disappointed with the final results. If you need a little help with the shape you can use the *pencil technique by applying a light colored pencil first to get your wings just right, clean up any mistakes with a Q-tip and makeup remover, and then trace over with your liquid. You can use the same technique with a gel liner, or gel eyeliner pencil too. It works like a charm.
To begin using your light colored pencil (gray or taupe works great), start first by lining along the lash line beginning at the inner corner and working out towards the outer eyelid. The key is to line as close to your lash line as possible. There shouldn’t be any space between your lid and lashes. As you get towards the center of lid this is where you’ll begin to extend the color up and out to create the winged look. For a thicker line you can repeat this step from the middle of eye and out. Clean any unwanted color with a Q-tip and eye makeup remover before going over with your liquid or gel.
For those who aren’t quite ready to dive in and try the winged liner look for fear of messing up, but do love it, we have the perfect makeup tool to get you over your eyeliner hump, a cat eye stencil. It’s designed to fit comfortably over any eye shape or size, is flexible, and can create both the winged and cat eyeliner look. With the cat eye stencil you’ll use an eyeshadow to create the look first and then go over with your liquid or gel formula.
For the best results once you have your cat eye stencil over your eye comfortably, hold in place using your middle and index fingers, and then fill in with your eyeshadow. You can repeat this step until you have the desired intensity. If you plan to trace over your eyeliner with a liquid or gel you will only need to do the above step just once.
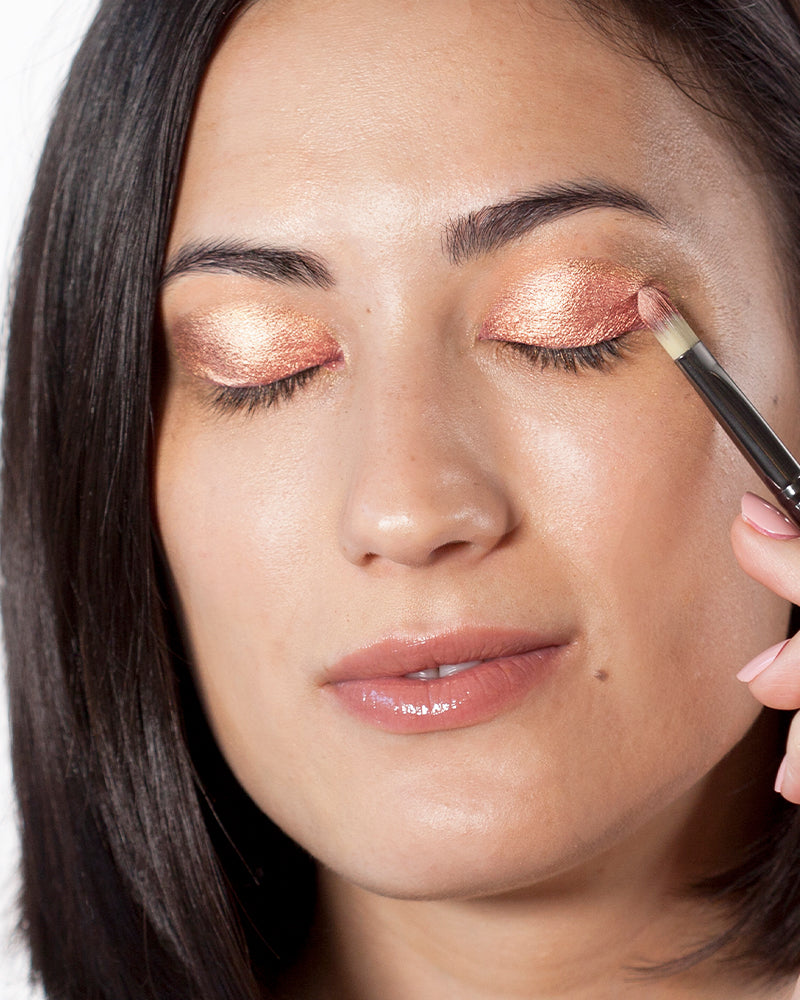
Classic Smokey Eye
Even if you’re not big fan of bold eyeshadow looks, the technique behind creating the smokey eye is something you should definitely know especially if you like to wear eye makeup. It’s the foundation of practically every eyeshadow look and can be darkened or lightened depending on the occasion.
For a classic smokey eye look you’ll need to have a few good brushes. The basics are an All Over Shader, Eyeshadow, Blender, and Eyeliner brush. You can add more from here like a fluffy blender brush, smudge brush, and other eyeliner brushes but the basics will be more than sufficient. Using an eyeshadow brush begin by applying the darkest shade along the lashline and blending the color up into the lid, deposit as much color as you desire before moving on to the next color.
Using the same eyeshadow brush to apply your next color. It should be a shade lighter than the lid color. Apply color so that it overlaps slightly with the darker color and blend well making sure to soften any harsh lines.Finish your smokey eye look by adding a dark color that is in the same hue or compliments your lid color to the outer crease using a blender brush. With the tip of brush placed in crease move your brush back and forth using the “windshield wiper” effect. Color should not go further than the middle of eye/crease and should not extend beyond the end of your brows. To bring your eye makeup look together, using the lightest shade, highlight your browbone using your All Over Shader brush. Blend your highlighter in the crease using your blender brush to soften any hard lines.

How to Apply Bronzer
Bronzer is one of those beauty products that everybody owns but hardly anyone really knows how to use. Whether you’re just in the mood to impart a nice summer glow or want to use it to add a bit of definition to those cheeks of yours, there’s a bronzing technique for you to master.
For highlighting the cheeks, apply the color in the hollow of cheeks, below the cheek bones and blend. For this look you may want to use a brush that is smaller in size like a blush brush so you can apply your bronzer with precision. A great tip for creating this look is to use a matte bronzer to contour and a shimmer highlighter along the top of cheekbones.
To define your face using a bronzer you would apply to all of those spots where the sun naturally hits your face. The cheeks, center of forehead, chin, and bridge of nose. You can also add to the jaw line but that is optional. To finish the look pick up a blush in a soft pink, rose, or apricot color depending on your skin tone and hit just the apple of cheeks. If you feel like you’ve added too much color grab a powder brush (no powder necessary) and take down the color by brushing over the areas that need to be softened.
How to Apply Concealer
Sometimes wearing concealer isn’t a must but for any smokey eye or cat eye look it’s a game changer. For both looks it create a seamless, crisp finish that will definitely make your eyes go pow! To do, if you’re using a pot apply a tiny amount of concealer on the back of your hand and tap the brush into it.
Starting at the inner corner of your eye, apply color underneath and out and along the outer shape of your cat eye or smokey eye.
Use your middle or index fingers to blend concealer by tapping/patting the color until it is seamless with your complexion. If your skin tends to be on the oily side, or if you live in a climate where the weather is hot or humid go ahead and set your concealer with a translucent powder.
How to Apply Liquid Liner
Creating the Perfect Liquid Liner Line: The secret to this is not to go across the eyelid in one fell swoop. Instead, use the ‘connect the dots’method and make short little lines where you want the liner to go. Then, go back over the lines and fill in the gaps by starting at the inside or center of the eyelid (the easiest part) and moving out towards the outer corners. By doing this, it takes the pressure off of having to create the perfect liner look all in one stroke and allows you more control and time to make the line as perfect looking as possible. For those who are trying their hand at applying liquid liner for the very first time, use the *pencil technique first to create your liner, and then trace over with your liquid.

How and Where to Highlight the Face
Highlighting the face is a gorgeous look that can be worn day or night and once mastered can become slightly addictive. For the most natural look we suggest using a liquid for the face and a shimmer in a powder form for under the brow bone. You can use the face chart above to get a sense of where to apply but the key parts of the face are along the cheekbones, bridge of nose, cupids bow, chin and center of forehead or along the top of brows. Apply using a small concealer brush and finish by patting the color in using your fingers. Check out My Secret Weapon liquid highlighter for creating the perfect highlighted look.