5 Contour and Highlighting Tips Everyone Should Know

It seems like anywhere you go on social media, there are tons of fantastic MUA’s showing off their contouring and highlighting (sometimes called ‘strobing’) skills. You may have watched several highlighting and contouring tutorials, only to throw your hands in the air and give up, but if you’re still willing to give it another go, these pro tips will help make the process a bit easier for you and you’ll be strobing and baking in no time.
1. Understand the terms
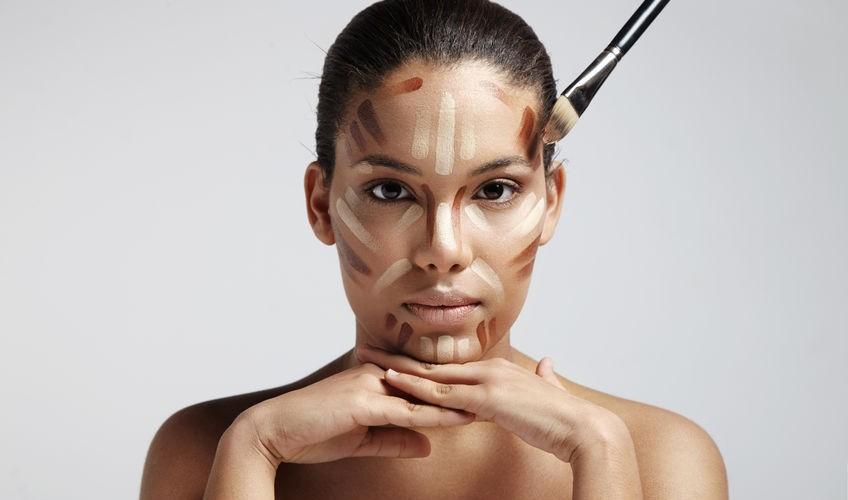
You can’t really experience success in anything without understanding what that thing is first. For starters, contouring is when you create shadows on the face by outlining to create the look you desire. When it comes to the face, shadows help to define specific areas. Contouring creates a super sculpted look that can help your nose appear slimmer, your forehead smaller and your cheekbones more sharp without going under the needle. Next, let’s talk about highlighting. Highlighting is the exact opposite of contouring. Instead of adding shadows, it’s adding light to the face. When you add a highlight to the face, you are “pulling it forward” and making the area appear more prominent. Think J-lo.

2. Contour and highlighting tools you need
There are several different types of tools you can use to apply contour and highlighting products. First, let’s talk about brushes. There are a few different types of brushes you can use for the products. When it comes to buying brushes, don’t skimp on them. Find good-quality brushes that will last you a while so your product is applied nicely on your face. For contouring, there are a few different brushes you can use, each one helping to apply the contour a bit different. An angled contour brush helps to get the perfect outline when contouring, while a small contour brush helps to produce a more sculpted look.
The small contour brush is best used when highlighting smaller areas on the face, (like on the sides of the nose and under your bottom lip) while the angled contour brush is best used for your cheekbones to get that nice line we all want. Kabuki brushes are great for blending the contour out so there are no harsh lines. When it comes to highlighting, we love fan brushes, which picks up just the right amount of highlighter to make your cheeks look luminous.
3. Types of products
The amount of different products you can use to contour and highlight can be over-whelming, but we’re here to break it down for you. When it comes to contouring, the most basic contour is a powder bronzer. It’s easy to work with and super easy to blend. The next step up would be a cream or cream to powder contour, which creates a more defined and sculpted look, but needs a little bit more work to blend than a powder contour. Cream bronzers can come in a tube, which gives you more control over the application, or a palette, where you have to use a contour brush to apply. However, the benefits of using a cream contour that is not in a stick formula is that you have more control over the amount of color that goes on your face and how intense it goes on.
Another way you can contour is by using a stick concealer that is several shades darker than your skin tone. As far as highlighters go, the same types of products are available to you. You can choose between a shimmery highlight powder or a cream (in a tube, compact or palette). Like contouring, you can also highlight using a cream or liquid concealer that is a few shades lighter than your skin tone.
4. Where to do it
When it comes to contouring, many people are confused as to where exactly they need to apply it. You probably know that the main place that you contour is your cheekbones, but there are several other places that contouring is also done. One way to map out the sides of your face for contouring is to create a number “3” with the bronzer. With the first ‘hump’ of the number being the side of your forehead, the second being your cheekbone and the third being the side of your chin. You can also contour the sides of your nose to make your nose appear slimmer.
Contouring under the bottom of your lower lip can also make your lips appear fuller because of the shadow. You can also contour the top of your forehead, near your hairline, to make your forehead appear smaller. The best way to figure out where to contour is to experiment and see what does and doesn’t work for you. When it comes to highlighting, the main place you want to highlight is directly above where you contoured your cheekbones. Other places you can highlight are your cupid’s bow, down the center of the nose, under the brow bone, and the center of chin.
5. Quick tips for better highlighting and contouring.
- If you have a round-shaped face, you will want to contour and highlight a bit different. Instead of contouring directly on your cheekbones, contour down the sides of your cheeks so it pulls your face down and makes it appear less round. Then, add blush where you would usually add bronzer. (on the cheekbones) Highlight the under-eye area with a light shade (no shimmer) and on the center of the chin.
- Add blush between your highlight and bronzer to create a perfect gradient. It’s a common misconception that you should always add blush directly on top of your bronzer. Instead, add it above the bronzer, blend and then add highlighter above the blush.
- If you want to make your cheekbones appear higher, apply the contour directly under the cheekbones, so it lifts them up. Then, you will want to apply your blush and/or highlighter on the cheekbone above it.


